2021. 6. 18. 00:50ㆍSpring
이번에는 Spring JDBC 를 사용 해봅시다.
Spring JDBC
Spring JDBC 는 , Database 에 접근하는 라이브러리를 뜻 합니다.
이는, java 에서 JDBC 를 사용해 Database 에 접근 했던 적이 있죠? 이제, Spring 에서 접근 하겠다 이겁니다.
저는 JAVA 1.8 버전, oracle 12.0 버전을 사용 하고 있습니다.
그러기 위해서는 먼저 "pom.xml" 에 아래의 코드를 추가해 줍니다.
아래의 코드는 <dependencies></dependencies> 사이에 추가 해주면 됩니다.
<!-- junit버전을 4.12로 변경 -->
		<dependency>
			<groupId>junit</groupId>
			<artifactId>junit</artifactId>
			<version>4.12</version>
			<scope>test</scope>
		</dependency>

		<!-- 오라클 커넥터 -->
		<dependency>
		    <groupId>com.oracle.database.jdbc</groupId>
		    <artifactId>ojdbc8</artifactId>
		    <version>19.7.0.0</version>
		</dependency>

		<!-- 히카리 커넥션풀 -->
		<dependency>
		    <groupId>com.zaxxer</groupId>
		    <artifactId>HikariCP</artifactId>
		    <version>3.3.1</version>
		</dependency>

		<!-- 스프링 JDBC -->
		<dependency>
		    <groupId>org.springframework</groupId>
		    <artifactId>spring-jdbc</artifactId>
		    <version>${org.springframework-version}</version>
		</dependency>

		<!-- 스프링 테스트환경 지원(Junit 단위 테스트 4.12이상 버전과 함께 사용) -->
		<dependency>
		    <groupId>org.springframework</groupId>
		    <artifactId>spring-test</artifactId>
		    <version>5.0.7.RELEASE</version>
		    <scope>test</scope>
		</dependency>
위의 코드를 추가했다면, Maven 업데이트 를 해주세요
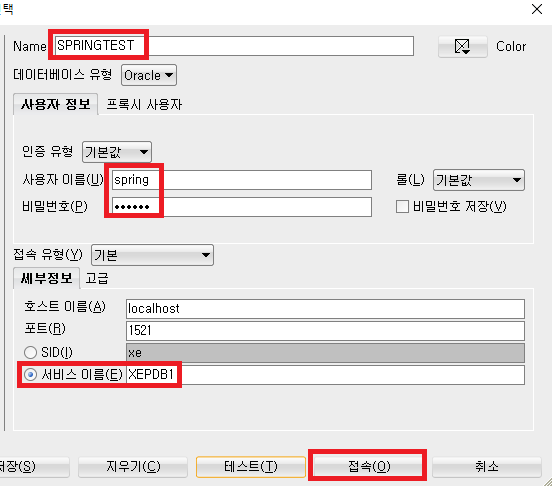
그리고, SQL Developer 에 들어가서, PDB 계정에서 아래의 코드를 추가하고, 실행합니다.

왼쪽 상단의 접속 계정을 추가합니다.


사용자 이름 : spring
비밀번호 : spring ( 연습용이라서 쉬운 비밀번호를 한 것 )
정상적으로 "SPRINGTEST" 계정이 만들어 졌다면, 아래와 같이 폴더 및 파일을 만들어 줍니다.

"hikari.properties" 에는 아래의 코드를 작성 해줍니다.

그리고, "root-context.xml" 파일에서 아래의 코드를 추가 해줍시다.

"root_context.xml" 파일 맨 아래에 있는 Namespaces 탭을 누르고 jdbc 를 체크 합니다.

그러면, "root_context.xml" 파일 상단에 스키마 가 추가된 것을 확인 할 수 있습니다.

이제, "src/test/java" 폴더에 아래와 같은 패키지와 , class 를 만들어 줍니다.

package com.simple.controller;

import java.sql.Connection;
import java.sql.SQLException;

import javax.sql.DataSource;

import org.junit.Test;
import org.junit.runner.RunWith;
import org.springframework.beans.factory.annotation.Autowired;
import org.springframework.test.context.ContextConfiguration;
import org.springframework.test.context.junit4.SpringJUnit4ClassRunner;

// 필요스펙 - junit 4.12이상, spring-test 라이브러리
@RunWith(SpringJUnit4ClassRunner.class) // was의가동없이 클래스를 실행시켜 줍니다
@ContextConfiguration("file:src/main/webapp/WEB-INF/config/root-context.xml") // 해당 파일을 스프링설정파일로 참조
public class DatabaseTEST {

	@Autowired
	private DataSource dataSource;

	private Connection conn;

	@Test // 해당 메서드를 실행
	public void test() {

		try {
			conn = dataSource.getConnection();

			System.out.println(conn);
		} catch (Exception e) {
			e.printStackTrace();
		} finally {
			try {
				conn.close();
			} catch (SQLException e) {
				e.printStackTrace();
			}
		}

	}

}
해당 파일을 실행 했을 때, 에러 없이 아래처럼 나온다면 성공

이렇게 성공 하셨다면, 성공적으로 database(oracle) 에 접속 한 것 입니다.
이제 이를 기반으로 java 에서 사용하던 jdbc 를 사용해 주면 되겠습니다.
먼저, 위에서 만든 "SPRINGTEST" 계정에 아래의 테이블과 시퀀스를 추가 합니다.

이제, 이 테이블에 데이터를 추가하고, 데이터를 가져오고, 데이터를 삭제하는 기능을 각각 Dao 에 만들어 줍니다.
database 에 데이터 추가
@Override
	public void regist(ScoreVO vo) {

		Connection conn = null;
		PreparedStatement pstmt = null;

		String sql = "insert into T_SCORE values(T_SCORE_SEQ.nextval, ?, ?, ?)";

		try {
			conn = dataSource.getConnection();

			pstmt = conn.prepareStatement(sql);
			pstmt.setString(1, vo.getName());
			pstmt.setString(2, vo.getKor());
			pstmt.setString(3, vo.getEng());

			pstmt.executeUpdate();

		} catch(SQLException e) {
			e.printStackTrace();
		} finally {
				try {
					if(conn != null) conn.close();
					if(pstmt != null) pstmt.close();
				} catch (SQLException e) {
					e.printStackTrace();
				}
		}

	}
database 에 있는 데이터 가지고 오기
@Override
	public List<ScoreVO> getList() {

		List<ScoreVO> list = new ArrayList<>();

		Connection conn = null;
		PreparedStatement pstmt = null;
		ResultSet rs = null;

		String sql = "select * from T_SCORE";

		try {

			conn = dataSource.getConnection();
			pstmt = conn.prepareStatement(sql);

			rs = pstmt.executeQuery();

			while(rs.next()) {

				ScoreVO vo = new ScoreVO();
				vo.setBno( rs.getInt("bno") );
				vo.setName( rs.getString("name") );
				vo.setKor( rs.getString("kor") );
				vo.setEng( rs.getString("eng") );

				list.add(vo);
			}

		} catch(SQLException e) {
			e.printStackTrace();
		} finally {
			try {
				if(conn != null) conn.close();
				if(pstmt != null) pstmt.close();
				if(rs != null) rs.close();
			} catch (SQLException e) {
				e.printStackTrace();
			}
		}

		return list;
	}
database 에 있는 데이터 삭제하기
@Override
	public void delete(int num) {

		Connection conn = null;
		PreparedStatement pstmt = null;

		String sql = "delete from T_SCORE where bno = ?";

		try {
			conn = dataSource.getConnection();

			pstmt = conn.prepareStatement(sql);
			pstmt.setInt(1, num);

			pstmt.executeUpdate();

		} catch (SQLException e) {
			e.printStackTrace();
		} finally {
			try {
				if(conn != null) conn.close();
				if(pstmt != null) pstmt.close();
			} catch (SQLException e) {
				e.printStackTrace();
			}
		}

	}
현재 사용한 database 에 접근 해서 데이터를 추가, 가져오기, 삭제 는 기존에 java 에서 jdbc 를 할 때와 똑같으니 설명은 생략하도록 하겠습니다.
spring mvc 구조에 의해서, Controller -> Service -> DAO 순으로 접근하게 됩니다.
이 때, Service , DAO 는 각각의 Interface 를 implements 받습니다.
'Spring' 카테고리의 다른 글
| Day88 - [Spring]롬복(Lombok) 설치 및 사용법 (0) | 2021.06.21 |
|---|---|
| Day87 - [Spring]myBatis (0) | 2021.06.19 |
| Day86 - [Spring]Spring Tool Suite 3 다운로드 (0) | 2021.06.18 |
| Day85 - [Spring]Service, Model 부분 만들기 (0) | 2021.06.16 |
| Day85 - [Spring]컨트롤러에서 view 로 변수 전달하기 (0) | 2021.06.16 |