2021. 5. 6. 23:58ㆍJSP 공부
이번에는 JSP 에서의 URL패턴과 MVC2 설계에 대해서 알아 보겠습니다.
URL패턴
URL 패턴에는 디렉토리 패턴과, 확장자 패턴이 있습니다.
디렉토리 패턴
디렉토리 패턴은, 아래와 같이 파일의 마지막 경로를 가지고 사용하는 패턴을 말합니다.
http://localhost:8181/cr/Hello --> /Hello 서블릿
http://localhost:8181/cr/World --> /World 서블릿
확장자 패턴
확장자 패턴은, 아래와 같이 *.확장자 명을 사용하는 패턴을 말합니다.
*를 사용하면, 앞에 어떤 경로가 붙더라도 마지막에 확장자로 판별하게 됩니다.
http://localhost:8181/cr/Hello.do --> *.do 서블릿
http://localhost:8181/cr/World.do --> *.do 서블릿
예제.


1. 서블릿의 URL매핑을 *.확장자 로 만듭니다.

2. 새로운 메서드를 만들고, get, post 메서드를 새로운 메서드로 연결합니다.
protected void doGet(HttpServletRequest request, HttpServletResponse response) throws ServletException, IOException {
		doAction(request, response);
	}

	protected void doPost(HttpServletRequest request, HttpServletResponse response) throws ServletException, IOException {
		doAction(request, response);
	}

	protected void doAction(HttpServletRequest request, HttpServletResponse response) throws ServletException, IOException {

    		String uri = request.getRequestURI(); // URI값
		String path = request.getContextPath(); // 컨텍스트 경로

		String command = uri.substring(path.length()); // 요청 분기

		System.out.println(command);

		if(command.contentEquals("/controller/join.test")) {
			// ....가입요청처리....
		} else if(command.contentEquals("/controller/login.test")) {
			// ....로그인처리...
		}
	}
command 에는 URL매핑을 통해서 연결되는 모든 파일의 경로를 가지게 됩니다.
그래서, if문을 통해 각각의 기능을 구현하면 됩니다.

MVC2 전체적인 컴포넌트 설계
MVC2 전체적인 컴포넌트 설계는, 위의 확장자 패턴을 사용합니다.

기존의 MVC1 설계는, 각각의 페이지마다 사용자에게 보여줄 화면과, 처리할 페이지를 만들어서 순서대로 넘어가게 했다면 MVC2 설계는, Controller 를 통해서, 페이지를 넘어가게 합니다.
MVC2 설계를 직접 해보도록 하겠습니다.
1. Controller 는 확장자 패턴을 사용해서 만들어 줍니다.
2. if문을 사용해서 각각의 페이지로 넘어가도록 해줍니다.
// 1.
@WebServlet("*.board")
public class BoardController extends HttpServlet {
	private static final long serialVersionUID = 1L;

    public BoardController() {
        super();
    }

    // 2. get, post요청 통일
	protected void doGet(HttpServletRequest request, HttpServletResponse response) throws ServletException, IOException {
		doAction(request, response);
	}

	protected void doPost(HttpServletRequest request, HttpServletResponse response) throws ServletException, IOException {
		doAction(request, response);
	}

	protected void doAction(HttpServletRequest request, HttpServletResponse response) throws ServletException, IOException {

		// 3. 요청분기
		request.setCharacterEncoding("UTF-8");

//		String command = request.getRequestURI().substring(request.getContextPath().length());
		String uri = request.getRequestURI(); // URI
		String path = request.getContextPath();

		String command = uri.substring(path.length()); // 요청경로

		System.out.println(command);

		// MVC2 방식은 forward 이동을 기본적으로 사용합니다. Redirect는 다시 컨트롤러로 연결할 때 사용합니다.

		// service의 인터페이스 타입을 선언(if문 안에서 알맞은 서비스 클래스로 연결)
		IBoardService service;

		if(command.equals("/board/list.board")) { // 글목록 요청
			// ....조회 메서드를 실행하고, 값을 가지고 화면으로 이동
			service = new GetListServiceImpl();
			service.execute(request, response);

			// 화면에 전달할 값이 있으니 forward이동
			request.getRequestDispatcher("board_list.jsp").forward(request, response);

		} else if(command.equals("/board/write.board")) { // 글작성 화면요청

			request.getRequestDispatcher("board_write.jsp").forward(request, response);
		} else if(command.equals("/board/regist.board")) { // 글 등록 요청

			// ....
			service = new RegistServiceImpl();
			service.execute(request, response);

			response.sendRedirect("list.board"); // 리다이렉트는 다시 컨트롤러를 태울때 사용합니다.
		}

	}
3. 각각의 페이지로 넘어갈 때는 기본적으로 forward 이동을 기본으로 하며, Redirect는 다시 컨트롤러로 연결할 때 사용합니다.
4. Interface 를 만들어서 원하는 기능을 각각 구현합니다.
Service를 아래와 같이 만들어 줍니다.


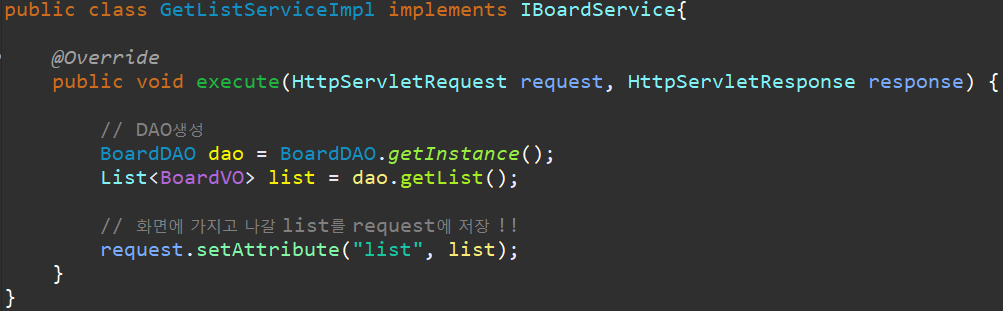
Service에서 DAO를 사용하는데, DAO는 VO를 가지고 데이터베이스와 연결 합니다.
public class BoardDAO {

	// 1. 스스로 객체를 1개 생성합니다.
		private static BoardDAO instance = new BoardDAO();

		// 2. 외부에서 생성자를 호출할 수 없도록 생성자에 private제한을 붙임
		private BoardDAO() {
			try {
//				Class.forName("oracle.jdbc.driver.OracleDriver");

				// 커넥션풀을 얻는 방법
				InitialContext ctx = new InitialContext();
				ds = (DataSource)ctx.lookup("java:comp/env/jdbc/oracle");

			} catch(Exception e) {
				System.out.println("드라이버 호출 에러!");
			}
		}

		// 3. 외부에서 객체생성을 요구하면 getter메서드를 이용해서 1번의 객체를 반환
		public static BoardDAO getInstance() {
			return instance;
		}

		////////////////////////////////////////////////////
		// 멤버변수
		private DataSource ds; // 데이터베이스 연결풀을 저장해놓는 객체

		private Connection conn = null;
		private PreparedStatement pstmt = null;
		private ResultSet rs = null;

		// 글등록 메서드
		public void regist(String writer, String title, String content) {

			// insert...
			String sql = "insert into board(bno, writer, title, content) values(board_seq.nextval, ?, ?, ?)";

			try {
				conn = ds.getConnection();

				pstmt = conn.prepareStatement(sql);
				pstmt.setString(1, writer);
				pstmt.setString(2, title);
				pstmt.setString(3, content);

				pstmt.executeUpdate(); // 등록후에 끝.

			} catch (SQLException e) {
				e.printStackTrace();
			} finally {
				JdbcUtil.close(conn, pstmt, rs);
			}
		}

		// 글목록 조회
		public List<BoardVO> getList(){

			List<BoardVO> list = new ArrayList<>();

			String sql = "select * from board order by bno desc";

			try {
				conn = ds.getConnection(); // 연결

				pstmt = conn.prepareStatement(sql); // sql준비

				rs = pstmt.executeQuery(); // sql문 실행

				while(rs.next()) {
					// 한바퀴 회전당 VO를 하나씩 생성
					BoardVO vo = new BoardVO();

					vo.setBno(rs.getInt("bno"));
					vo.setWriter(rs.getString("writer"));
					vo.setTitle(rs.getString("title"));
					vo.setContent(rs.getString("content"));
					vo.setRegdate(rs.getTimestamp("regdate")); // 날짜형은 Timestamp() or Date()
					vo.setHit(rs.getInt("hit"));

					list.add(vo);
				}

			} catch (SQLException e) {
				e.printStackTrace();
			} finally {
				JdbcUtil.close(conn, pstmt, rs);
			}

			return list;
		}
}
컨트롤러를 통해서, UI화면(.jsp 파일)으로 이동합니다. 이 때 화면에 데이터베이스에서 가져온 값이 필요하기 때문에, request에 setAttribution 을 사용합니다. 그리고, 해당 request를 사용하기 위해서 forward를 사용하는 겁니다.
UI 화면
<%@ page language="java" contentType="text/html; charset=UTF-8"
    pageEncoding="UTF-8"%>
<%@ taglib uri="http://java.sun.com/jsp/jstl/core" prefix="c" %>
<%@ include file="../include/header.jsp" %>
	<style>
        .btn {

            border: 0;
            border-radius: 0; /*윤곽 0*/
            padding: 5px 10px;
            margin: 20px 0px;
        }
	</style>

	<div class="container">
		<h3>My Web게시판</h3>

		<table class="table table-bordered">
			<thead>
				<tr>
					<th>글 번호</th>
					<th>작성자</th>
					<th>제목</th>
					<th>날짜</th>
					<th>조회수</th>
				</tr>
			</thead>

			<tbody>
				<c:forEach var="vo" items="${list }">
					<tr>
						<td>${vo.bno }</td>
						<td>${vo.writer}</td>
						<td>${vo.title }</td>
						<td>${vo.regdate }</td>
						<td>${vo.hit }</td>
					</tr>
				</c:forEach>
			</tbody>

			<tbody>
				<tr>
					<td colspan="5" align="center">
	               			<ul class="pagination pagination-sm">
                        		<li><a href="#">이전</a></li>
                        		<li  class="active"><a href="#">1</a></li>
                        		<li><a href="#">2</a></li>
                        		<li><a href="#">3</a></li>
                        		<li><a href="#">4</a></li>
                        		<li><a href="#">5</a></li>
                        		<li><a href="#">다음</a></li>
                    			</ul>
					<input type="button" value="글 작성" class="btn btn-default pull-right" onclick="location.href='write.board'">

					</td>
				</tr>
			</tbody>

		</table>
	</div>

<%@ include file="../include/footer.jsp" %>
%@ page language="java" contentType="text/html; charset=UTF-8"
pageEncoding="UTF-8"%>
<%@ include file="../include/header.jsp" %>
<div align="center" class="div_center">
<h3>게시판 글 작성 페이지</h3>
<hr>
<form action="regist.board" method="post">
<table border="1" width="500">
<tr>
<td>작성자</td>
<td>
<input type="text" name="writer" size="10">
</td>
</tr>
<tr>
<td>글 제목</td>
<td>
<input type="text" name="title" >
</td>
</tr>
<tr>
<td>글 내용</td>
<td>
<textarea rows="10" style="width: 95%;" name="content"></textarea>
</td>
</tr>
<tr>
<td colspan="2">
<input type="submit" value="작성 완료">
<input type="button" value="목록" onclick="location.href='list.board'">
</td>
</tr>
</table>
</form>
</div>
<%@ include file="../include/footer.jsp" %>오늘은 이렇게, URL패턴과 MVC2 설계에 대해서 알아 보았습니다.
고생하셨습니다.
'JSP 공부' 카테고리의 다른 글
| Day59 - [JSP]페이징 (1) | 2021.05.10 |
|---|---|
| Day 58 -[JSP]MVC2 게시판 만들기 (0) | 2021.05.09 |
| Day56 - [JSP]연결풀(Connection pool) (0) | 2021.05.05 |
| Day56 - [JSP]JSTL (0) | 2021.05.05 |
| Day56 - [JSP]EL (0) | 2021.05.05 |